CHAP 1 - Introduction CHAP 2 - Some Basic Specs CHAP 3 - Locations of Major Equipment CHAP 4 - the "TRACS" Computer System CHAP 5 - the High Voltage, Auxiliary and Propulsion Systems CHAP 6 - the Low Voltage Systems and Batteries CHAP 7 - the Air System CHAP 8 - the Braking System CHAP 9 - the Suspension System CHAP 10 - the Trucks CHAP 11 - the HVAC Units CHAP 12 - the PA and Intercom System CHAP 13 - the Pantographs CHAP 14 - the Doors CHAP 15 - the Couplers CHAP 16 - the Lighting System CHAP 17 - the Destination Signs CHAP 18 - Winterization CHAP 19 - Operation CHAP 20 - Maintenance CHAP 21 - Floobydust
19.0 Before we get into how simple these things are to operate, we should go over the three consoles the operator has at his fingertips. There is no official designations for the
consoles, so I will call them the left; center, or main; and the right consoles.
19.1 The center, or main console (Picture 19-1) has the primary and most used train controls for "plain-ole" car operation, not taking into account passenger oriented
things like the doors.
19.2 If you notice in picture 19-1, all of the "stuff" you need to get the car up and going (or "to sleep") is located in the lower right hand corner of the main
operators console. There are three buttons for the AUXILLARIES (1).... OFF, ON and STORAGE. These three buttons along with the MAIN
CONTROL (2)(the 81 key), are THE main operational controls of the train. In order to get the train moving or much of anything else, they both need to be ON.
19.3 Above the MAIN CONTROL is the SPEED MODE switch (3), the OVERSPEED indicator (4), and the Sonalert (5). The speed mode switch selects the maximum speed the car
can go. In the NORMAL mode, the LRV can go as fast as the ATP and the TRACS speed limit switch will allow. The next position is the YARD mode, with limits car speed to 12MPH, for
operation (obviously) in the yard. The final speed switch position is the WASH, or carwash mode, which limits car speed to roughly 1-1/2MPH. The overspeed annunciator lights up
when you exceed the limits selected by the SPEED MODE switch. The Sonalert also starts blasting away at you when the OVERSPEED indicator starts flashing.
19.4 There are two gauges. The left one is a speedometer (6), and uses a standard 270 degree instrument type meter (4-20ma). The right gauge (7) is for the important air pressures of the
train. The white needle indicates the MRP pressure, or the pressure on the main line that supplies air to everything, to all of the cars in a consist. The red needle gives us the brake pressure.
In the photo, the needle is around 18 pounds, telling us that the brakes are applied. For the brakes to be released, we need 90 pounds showing. Note that the gauge only shows the braking pressure of
the end of the car the gauge is on. Also be aware, that if your brakes are "cut-out" the gauge will not show this, and you may think you have braking when you DO NOT!
19.5 Below the speedometer is a bright red button (8) labeled EMERGENCY STOP. Pressing this "mushroom" will kill the propulsion, and apply maximum braking,
including the track brakes. I had to use it once in the yard after coming out of the shop on track 3N to avoid hitting an MOW truck that didn't slow down and/or look before crossing the tracks in the
yard... phew.... it really works!
Picture 19-1 Main operators console
19.6 On the right console, we have the lighting controls (1), the VHF radio (2), cab heater controls (3), "right" side door controls (4), and the SECONDARY CONTROL
(5).
19.7 The radio is a Motorola radio, and operates on 161.01MHz. They were going to replace it with a UHF trunking radio back in the mid 90's, and the new radios were installed, but
for some reason, they never switched over to them. They were also going to connect the pre-emption system to the UHF radios for position reporting, but again, that never happened either (beaucoup bucks
wasted!!!).
19.6 The two heating controls select the function of the in-dash heater unit, and can either heat the operator under the dash, or be directed onto the windshield for defrosting.
19.8 Last but not least, is the secondary control. This lever switch duplicates the functions of both the VEHICLE DIRECTION CONTROL
switch and the MASTER CONTROLLER. If for some reason, the main controller is disabled, the secondary controller will take over, as it is hard
wired to discrete control lines going into the TRACS computer. Operating the train in this mode is not for the faint of heart, as the train responds rather slowly to control changes.
Picture 19-2 The right console
19.9 SO.........What is it like to operate one of these things? For those of you reading this and are Baltimore Streetcar fans, and are familiar with operating 264 or 554, nothing
like it at all. Closest thing would be 7407, if familiar with operating PCC cars.
19.10 There are two keys involved in the operation of the LRV's. One is the "47" key, the other is the "81" key. These numbers refer to the last two digits of the
imprinted key number. The "81" is used only for "keying up". The "47" key is used for everything else, such as entry to the car through the crew switches, access to the
cabs, and access to the equipment lockers and door operators.
19.11 Let's assume the car is AUXED-OFF. You use the "47" key to gain access through doors 1 or 5 (on the old cars), or doors 1, 4, 5, and 8 on
the new cars. This can be tricky if the car has been sitting for a while and the air has leaked down -- you have to then pull the doors open once they have been unlatched. Once inside
the car, you enter the cab, which also uses a "47" key for access.
19.12 First thing you usually do, after getting in the cab, is to "aux on". You do this by hitting the AUXILLARIES button labeled ON (for the train
to respond, the VEHICLE DIRECTION CONTROL must be set in the NEUTRAL position). The ON button should light up (green) and you should hear a "boink" over the PA system.
19.13 If you notice in picture 19-1, all of the "stuff" you need to access only to get the car up and going (or "to sleep") is located in the lower right hand corner of the
main operators console. There are three buttons for the AUXILLARIES.... OFF, ON and STORAGE. These three buttons along with the main
control (the 81 key), are THE main operational controls of the train. In order to get the train moving or much of anything else, they both need to be ON.
19.14 If you plan on having the car move under its own power, you must also make sure that the pantograph is up. You must be KEYED-UP in order for the UP button
to work. It doesn't matter if the car is AUXED-ON or AUXED-OFF to raise the pan (you could even be moving and the UP button will work, but it is not something I would recommend doing).
19.15 Once the car is AUXED-UP, you make sure the main pressure (white needle) is within the proper 130-150PSI range and that you have no faults on the F.I.S. display..... The red
pressure needle should be somewhere in the 18-30PSI range, and the yellow (friction brakes) APPLIED indictor on the left panel should be lit.
19.16 Make sure the doors are closed and that the two DOOR CLOSED (green) indicators are lit. You are now ready to move the car.
19.17 Select the FORWARD mode and one of the three speeds. The WASH mode will limit you to approximately 2mph. In the YARD mode, speed is
limited to 12mph, and if you continue to operate with the OVERSPEED indicator blasting away, the train will stop itself in about 10 seconds or so. In the NORMAL mode, speed has been set for
a maximum of 45mph. The software was changed so that if overspeed is reached in the NORMAL mode, the computer will just back off the propulsion a little bit to slow you down. It used to be that it would bring
the train to a complete halt.
19.18 Keeping a down force on the MASTER CONTROLLER (that is the "deadman" safety feature), move it out of the
FULL SERVICE position forward past the
indent. The indent is the COAST position, where neither propulsion or braking is applied. The red pressure needle should now go up to 90PSI, indicating that the brakes have released, and you
should also get a corresponding BRAKES RELEASED (green) light on the left panel. The car will start to move.
Picture 19-3 The Master Controller
19.19 The control is linear, so if you move the stick halfway between COAST and FULL POWER, you will eventually reach about 22-25mph. Bring the controller back
to COAST, and you will notice it does just that, but you will also hear some valves actuating, air escaping, and the red needle going down to around 70PSI. This is the inshot referred to in the
braking section, and is preparing the brakes to be applied. This is also where an operator can pull down the air supply if you are not careful, because the brake system inshot process is venting off air
from the air supply system.
19.20 By continuing to pull back on the controller, you start the braking process. This section of the master controller movement is also linear, and the farther back towards FULL
SERVICE you bring it, the more braking action you apply. If you continue past the stop, you will go into
FULL STOP… actuating the track brakes and bringing them down. Also......if you
push the controller forward past the full power position, you will do the same as pulling it all the way back: full stop and dropping the track brakes.
19.21 There…… Nothing could be easier, could it?
OPERATING FLOOBYDUST…
19.22 Some of these things may have been “fixed” since I left there in 1998, but considering a software change from Adtranz cost upwards of 10 grand, I highly doubt it.
19.23 If you are coupled to additional cars, the F.I.S. will alert you to the fact and annunciate the car numbers on the display. The >FAULT ACK button (on the
left console) will be flashing red, and you have to press it to acknowledge the fault (yes, it's considered a fault), and, to clear the display.
19.24 If another car is coupled to the one you are in (to your rear), and you do not "key down", your computer doesn't recognize that there is another car attached. This can lead to
accidents because the car behind you can now have it's doors open and move at the same time. By keying down, it allows your computer to go out on the ITDC trainline and query for other cars. If you don't key down,
it can't query, and hence, doesn't know another car (or two) is behind you. It will still control the propulsion, braking and doors though. The reason this only happens if you couple up from behind is: if you
couple up to another car face on, you have to go to the other end of the car in order to move. Then the computer has a chance to go out and query the trainline for additional computers.
19.25 If you get stuck on an IJ (Insulated Joint), and you are on a slight incline, you can get yourself off by doing the following: Put the car in NEUTRAL
and CARWASH mode. Now go to apply power, and the brakes will release. If you are on a sufficient grade, the car will drift enough for you to get "unstuck".
19.26 Another "coasting" note. If you have propulsion available (no "nasty-grams" on the FIS), the computer will not let you coast above zero speed without stopping you. If you have
gone over an IJ, and now have TRACTION on the FIS (because the main CB has opened up), you can coast faster than the overspeed limit of 1.5-2mph.
19.27 If you go to couple up to another car, you should do this in the CARWASH mode to restrict the speed, as the couplers have a 3mph restriction to prevent damage to the deformation tube.
19.28 If, for some reason, cars became uncoupled while moving, both cars will be shut down (the main hi-voltage circuit breaker opens, preventing propulsion) by the computer and the brakes applied.
This has happened one or twice in the yard where there was not a good mechanical coupling.
19.29 If you are running at a speed over the overspeed threshold of 2mph, and hit the emergency mushroom, the train will come to an abrupt stop because the track brakes have dropped, full friction
braking is applied, and the main hi-voltage circuit breaker had opened up. 750V power will be returned automatically once the car has stopped.
19.30 If you put the car in the FORWARD direction, and just barely get moving (under zero speed), then put the car in NEUTRAL (keeping the master controller
in a power position), the car will come to a stop and then go in the reverse direction for about three or four seconds. This one problem I know was fixed in one of the "warranty fixes"
revisions done by ADtranz.
19.31 If, for some reason (and this IS NOT a typical operating scenario), you are in a car with it's pantograph down, with the car auxed up, AND you are moving, you can push the PAN UP
button and the pantograph will go up. The main CB will close and you will have power available.
 NEXT Chapter ►
 Picture 19-1 Main operators console
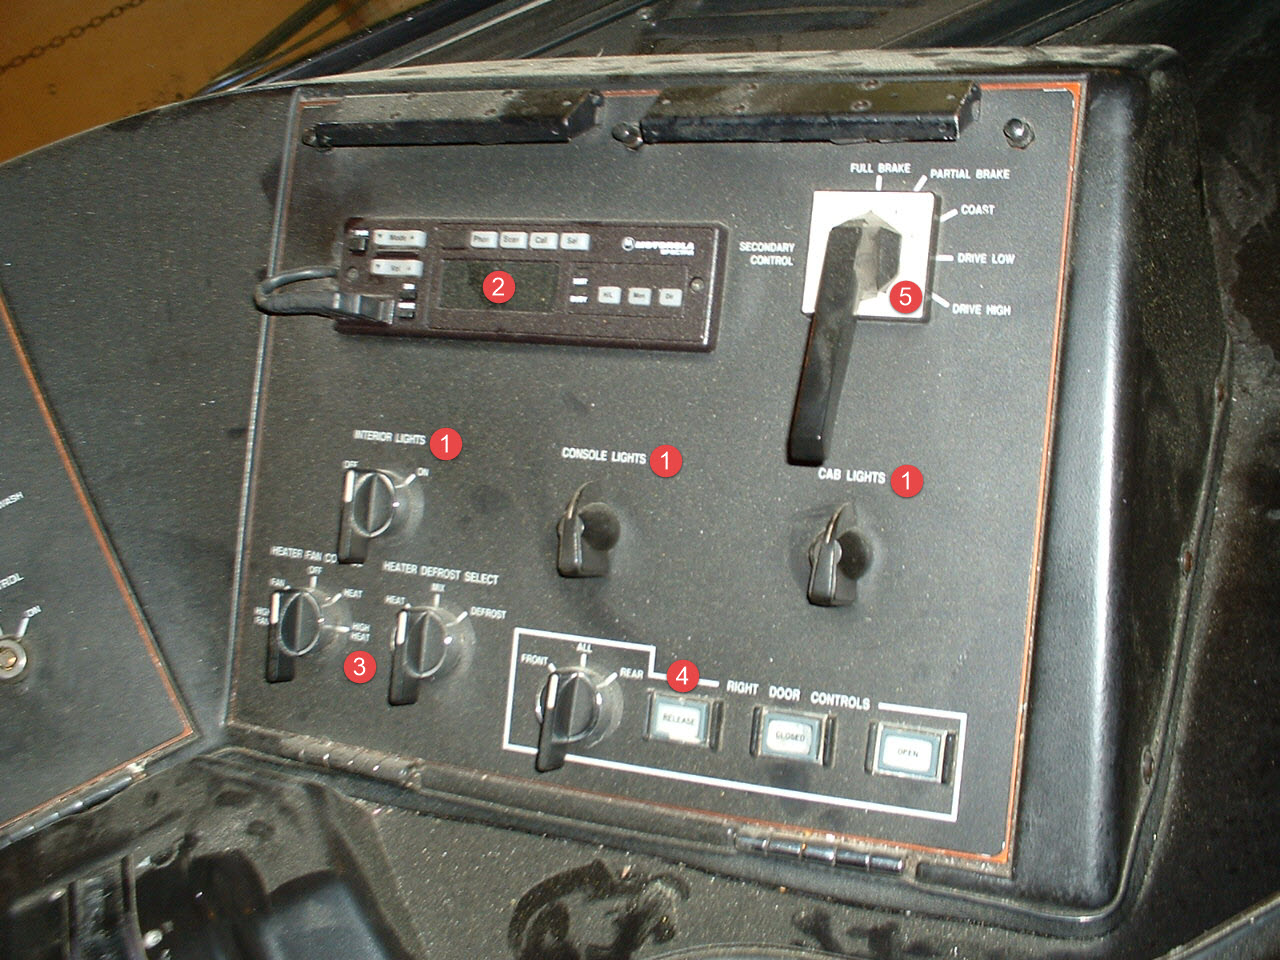 Picture 19-2 The right console
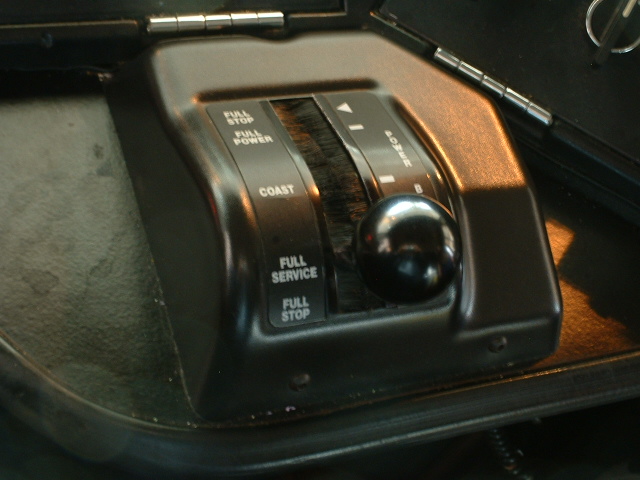 Picture 19-3 The Master Controller